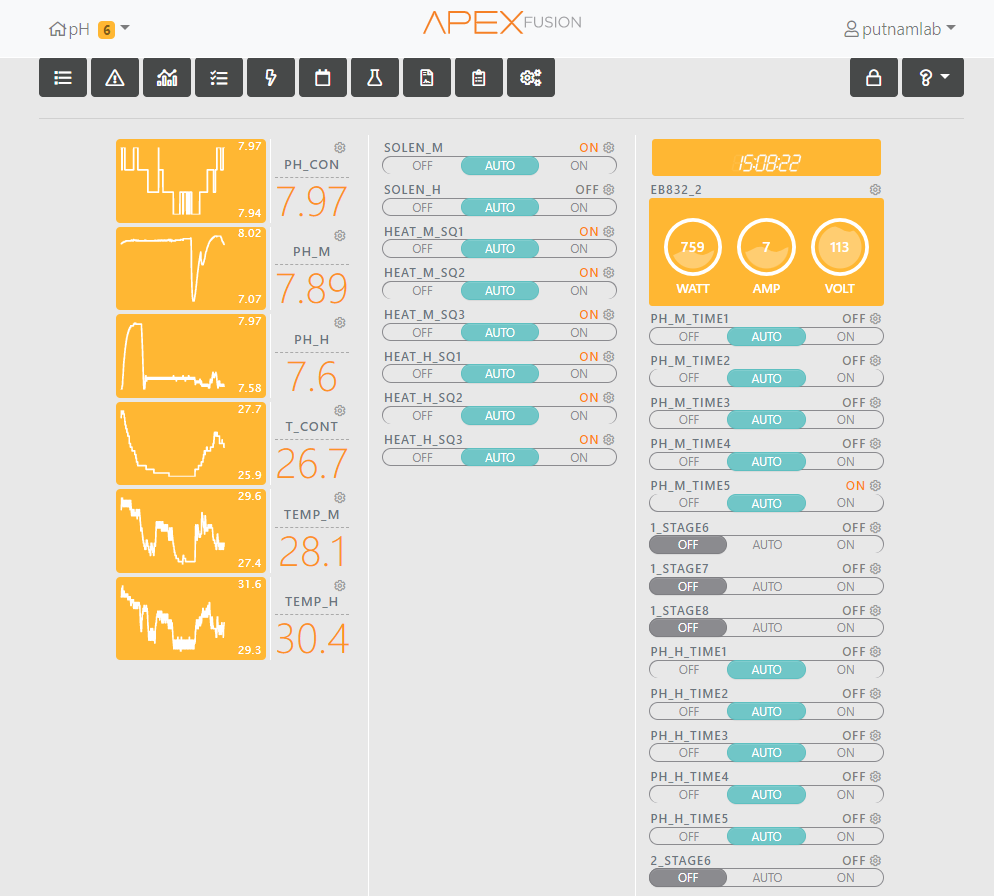
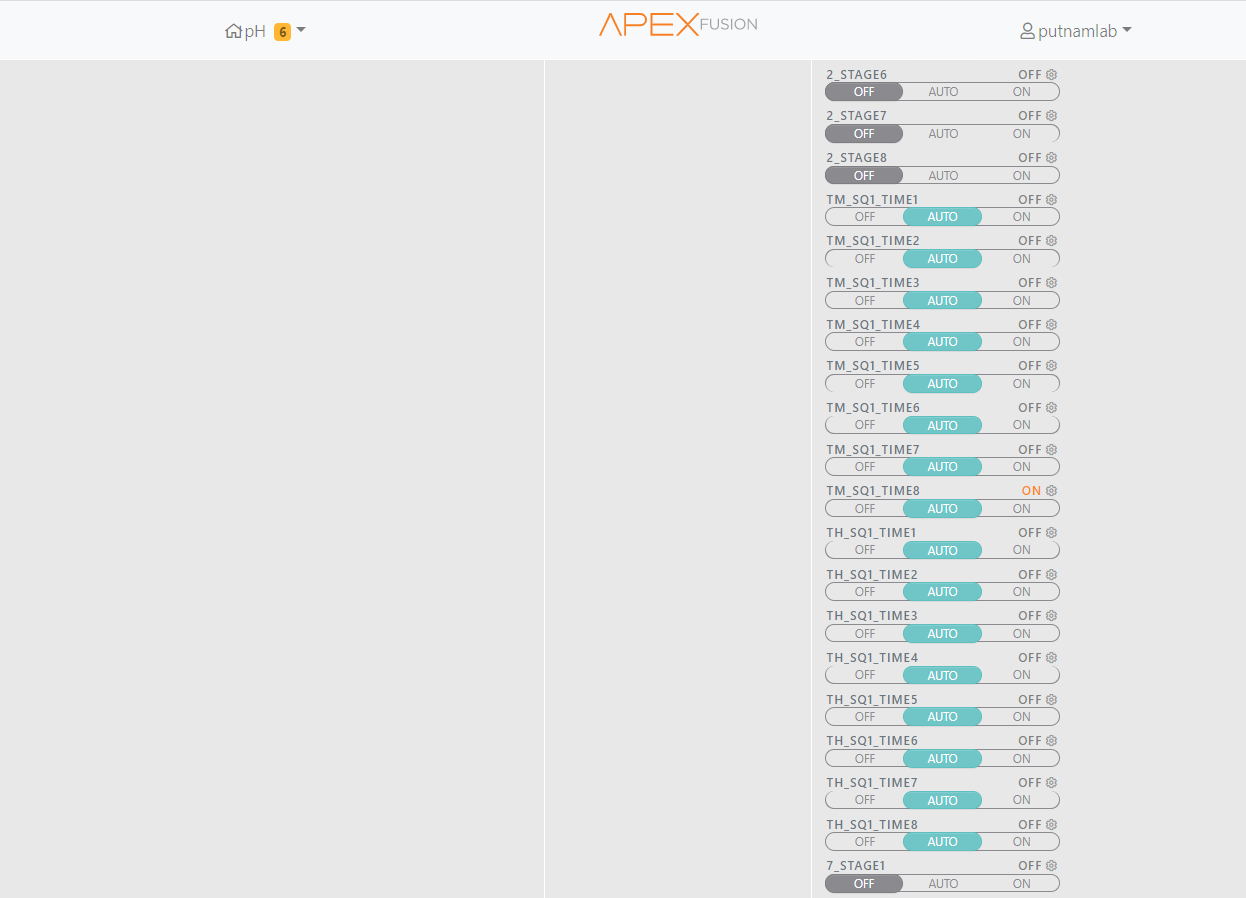
APEX set up for pH-temperature experiment
This protocol details the step-by-step programming use of the Apex Fusion system for pH-temperature experiments performed at the Hawaiian Institute of Marine Biology (HIMB) in June-July 2022 with planulae of the coral species Montipora capitata and Pocillopora acuta.
All the equipment used belongs to the Putnam Lab.
In my experimental design, I set up a system by manipulating temperature and pH at the same time, based on future predictions of seawater temperature increase by 0.2–3.5 °C with concomitant drops in pH of 0.1–0.3 units by the year 2100, depending on the CO2 emissions scenario (IPCC, 2019). Target temperature and pH conditions for the experiment: control (present-day temperature with present-day pH), ocean acidification (present-day temperature crossed with -0.15 and - 0.3 pH units), and combined end-of-century warming and acidification conditions (+1.5°C with -0.15 pH, +3.5°C with -0.3 pH).
Connecting Apex equipment
- Connect the Apex system to WiFi for temperature and pH control. This process required a lot of troubleshooting, see more about connecting the system here.
- Connect the Apex system to the Apex Fusion app.
- Plug the Apex brain into an ethernet cable and go through the set-up stages on phone using with the Apex app.
- Confirm that the Apex shows up on Fusion and unplug the ethernet cable.
- On the computer, go to apex.local and login into the Putnam Lab account. From the Apex list, select the specific Apex that was just added.
Programming Apex
- Important! Whenever changes are made on the Apex Fusion website, they must be pushed to the Apex device by clicking the orange cloud icon in the top right of screen. If they are not pushed, no changes will be made.
- On the Apex’s main dashboard, click ‘expand’ on the icon list and then ‘click on modules’. The module page will show which PMs/EBs are connected or associated with the Apex.
- Using aquabus cables, connect EB to the first PM. Check that the PM light is green once connected.
- Click ‘refresh’ the on fusion page. The new PM should now show up as active.
- Link another PM to the first PM using another aquabus cable and check that it is active online. Repeat this process for each PM, adding them one at a time and daisy-chaining them to one another.
- When the PMs appear on fusion, they will have names/numbers. Record these so it is known which PM is associated with which probe/treatment. Here are the labels that I used for each unit:
Control: EB832_2 (brain) Medium: PM1_3 High: PM1_4 - Once PMs are all active, go to the main Apex page. Click ‘new tiles’ (icon looks like a lock) in the top right hand corner.
- Move down the PM temperature and pH probe tiles into the main Apex space. Each PM has a temperature and pH probe attached. Here are the labels that I used for each probe:
pH_CON pH_M pH_H T_CONT TEMP_M TEMP_H - Move down the tiles for outlets. These have off/auto/on options.
- Click the settings button in the top right hand corner of the outlet tile and rename as outlet 1-8. Change control type to advanced. Under configuration, fallback should be off. Ignore probe name and on/off temperature, as the new input code will override this information.
- In the configuration section for each outlet, I put the following code. Note that here I named the virtual outlets with custom names, which can be changed however is helpful for the respective project. Note: SOLEN stands for “solenoid” and HEAT stands for “heater”.
Set OFF If Outlet SOLEN_M = ON Then ON If Outlet SOLEN_H = ON Then ON If Outlet HEAT_M_SQ1 = ON Then ON If Outlet HEAT_M_SQ2 = ON Then ON If Outlet HEAT_M_SQ3 = ON Then ON If Outlet HEAT_H_SQ1 = ON Then ON If Outlet HEAT_H_SQ2 = ON Then ON If Outlet HEAT_H_SQ3 = ON Then ON - Check to make sure outlets work by turning all outlets on and off. On the energy bar, orange lights should turn on and a click will sound when the outlet is on; when off, orange light will turn off and click will sound.
Set up the virtual outlets Here I used the virtual outlets to control the temperature and pH in my treatment squaricals, including daily flactuations observed in the control squaricals that were monitored during the week before the start of the experiment.
- Click the new tiles (icon looks like a lock) in the top right hand corner.
- Move down the virtual outlet tiles.
- Click the settings button next to outlet. Change “icon” to up/down arrows and “control type” to advanced.
- This is the script that I put in the configuration section of each stage for the temperature system:
tM_sq1_time1
Set OFF
If temp_M < 27.6 Then ON
If temp_M > 27.6 Then OFF
If Time 01:00 to 04:00 Then OFF
If Time 08:01 to 00:59 Then OFF

tM_sq1_time2
Set OFF
If temp_M < 27.7 Then ON
If temp_M > 27.7 Then OFF
If Time 04:01 to 08:00 Then OFF
If Time 9:31 to 23:00 Then OFF

tM_sq1_time3
Set OFF
If temp_M < 28.0 Then ON
If temp_M > 28.0 Then OFF
If Time 23:01 to 09:30 Then OFF
If Time 11:01 to 21:00 Then OFF

tM_sq1_time4
Set OFF
If temp_M < 28.2 Then ON
If temp_M > 28.2 Then OFF
If Time 21:01 to 11:00 Then OFF
If Time 13:01 to 19:00 Then OFF

tM_sq1_time5
Set OFF
If temp_M < 29.0 Then ON
If temp_M > 29.0 Then OFF
If Time 17:01 to 13:00 Then OFF
If Time 14:01 to 16:00 Then OFF

tM_sq1_time6
Set OFF
If temp_M < 28.7 Then ON
If temp_M > 28.7 Then OFF
If Time 01:00 to 17:00 Then OFF
If Time 19:01 to 00:59 Then OFF

tM_sq1_time7
Set OFF
If temp_M < 29.5 Then ON
If temp_M > 29.5 Then OFF
If Time 01:00 to 14:00 Then OFF
If Time 15:01 to 00:59 Then OFF

tM_sq1_time8
Set OFF
If temp_M < 29.7 Then ON
If temp_M > 29.7 Then OFF
If Time 01:00 to 15:00 Then OFF
If Time 16:01 to 00:59 Then OFF
tH_sq1_time1
Set OFF
If temp_H < 29.1 Then ON
If temp_H > 29.1 Then OFF
If Time 01:00 to 04:00 Then OFF
If Time 08:01 to 00:59 Then OFF

tH_sq1_time2
Set OFF
If temp_H < 29.2 Then ON
If temp_H > 29.2 Then OFF
If Time 04:01 to 08:00 Then OFF
If Time 9:31 to 23:00 Then OFF

tH_sq1_time3
Set OFF
If temp_H < 29.5 Then ON
If temp_H > 29.5 Then OFF
If Time 23:01 to 09:30 Then OFF
If Time 11:01 to 21:00 Then OFF

tH_sq1_time4
Set OFF
If temp_H < 29.7 Then ON
If temp_H > 29.7 Then OFF
If Time 21:01 to 11:00 Then OFF
If Time 13:01 to 19:00 Then OFF

tH_sq1_time5
Set OFF
If temp_H < 30.5 Then ON
If temp_H > 30.5 Then OFF
If Time 17:01 to 13:00 Then OFF
If Time 14:01 to 16:00 Then OFF

tH_sq1_time6
Set OFF
If temp_H < 30.2 Then ON
If temp_H > 30.2 Then OFF
If Time 01:00 to 17:00 Then OFF
If Time 19:01 to 00:59 Then OFF

tH_sq1_time7
Set OFF
If temp_H < 31.0 Then ON
If temp_H > 31.0 Then OFF
If Time 01:00 to 14:00 Then OFF
If Time 15:01 to 00:59 Then OFF

tH_sq1_time8
Set OFF
If temp_H < 31.2 Then ON
If temp_H > 31.2 Then OFF
If Time 01:00 to 15:00 Then OFF
If Time 16:01 to 00:59 Then OFF
- This is the script that I put in the configuration section of each stage for the temperature system:
pH_m_time1
Set OFF
If pH_M < 7.80 Then OFF
If pH_M > 7.80 Then ON
If Time 1:00 to 6:00 Then OFF
If Time 11:00 to 00:59 Then OFF

ph_m_time2
Set OFF
If pH_M < 7.85 Then OFF
If pH_M > 7.85 Then ON
If Time 01:00 to 11:00 Then OFF
If Time 13:00 to 00:59 Then OFF

ph_m_time3
Set OFF
If pH_M < 7.88 Then OFF
If pH_M > 7.88 Then ON
If Time 01:00 to 13:00 Then OFF
If Time 16:00 to 00:59 Then OFF

ph_m_time4
Set OFF
If pH_M < 7.86 Then OFF
If pH_M > 7.86 Then ON
If Time 01:00 to 16:00 Then OFF
If Time 19:00 to 00:59 Then OFF

ph_m_time5
Set OFF
If pH_M < 7.82 Then OFF
If pH_M > 7.82 Then ON
If Time 06:00 to 19:00 Then OFF
pH_H_time1
Set OFF
If pH_H < 7.65 Then OFF
If pH_H > 7.65 Then ON
If Time 1:00 to 6:00 Then OFF
If Time 11:00 to 00:59 Then OFF

pH_H_time2
Set OFF
If pH_H < 7.70 Then OFF
If pH_H > 7.70 Then ON
If Time 01:00 to 11:00 Then OFF
If Time 13:00 to 00:59 Then OFF

pH_H_time3
Set OFF
If pH_H < 7.73 Then OFF
If pH_H > 7.73 Then ON
If Time 01:00 to 13:00 Then OFF
If Time 16:00 to 00:59 Then OFF

pH_H_time4
Set OFF
If pH_H < 7.71 Then OFF
If pH_H > 7.71 Then ON
If Time 01:00 to 16:00 Then OFF
If Time 19:00 to 00:59 Then OFF

pH_H_time5
Set OFF
If pH_H < 7.67 Then OFF
If pH_H > 7.67 Then ON
If Time 06:00 to 19:00 Then OFF
Essentially, each outlet on the energy bar is listening to the 8 virtual outlets and turning on/off heaters and solenoids based on that.


Calibrate temperature and pH probes For the temperature probes:
- Fill a tripour with freshwater and insert a digital temperature probe in it, together with one of the apex temperature probes.
- Let probes sit for 2-4 minutes.
- Click on settings button next to temperature probe tile. Click “calibrate”.
- It will say “When ready, press Calibrate to start”. Click “calibrate”.
- Enter the temperature value from the digital temperature probe and click “next”.
- Calibration is complete! click “done”.
For the pH probes I followed the instructions here.
REMINDER!! Push all changes made on apex fusion to apex device
